How to Build a DIY Batting Cage
Wondering how to build a DIY batting cage? We can help! This spring marked our FIRST spring in the new house and with it my husband, a former minor league baseball player, started doing baseball lessons out of our home. At first, he had a few people interested in lessons, but he was having a hard time finding a great place to practice hitting and if he did find a place, it came with higher fees. We set out to research how we could build a DIY batting cage on our property so that kids could learn from my husband. We thought it was a wonderful idea to have our own batting cage since we are a baseball family after all! My son started in little league, which he loved, so we wanted to make sure he had the best chance of making it to the MLB!

Table of Contents
Creating a Backyard Batting Cage for Our Son
We also wanted a place for our son to practice his hitting drills with his dad and we didn’t have to worry about taking out a passing car or breaking a window. I’m a baseball mom, so of course I thought about these things! The problem was…we couldn’t find any “pre-fabricated” batting cages on the web that weren’t thousands of dollars OR very flimsy with low reviews. The affordable ones had poor reviews and the alternatively priced, higher quality options were just too much for our budget. So, we decided to just construct our own batting cage. Today, I’ll share with you a tutorial on how to build a DIY batting cage affordably in your own backyard!!
Note: You can also use these same instructions to build a DIY softball batting practice net! We used ours for baseball training, but really it works for either baseball or softball practice.
Choosing a Net for Your DIY Batting Cage:
A good batting cage net is important, since this is what will prevent the ball from going where it isn’t supposed to! We have a big yard, but the whole purpose of this project is to keep the ball IN the net. So a good net from a reputable company is important.
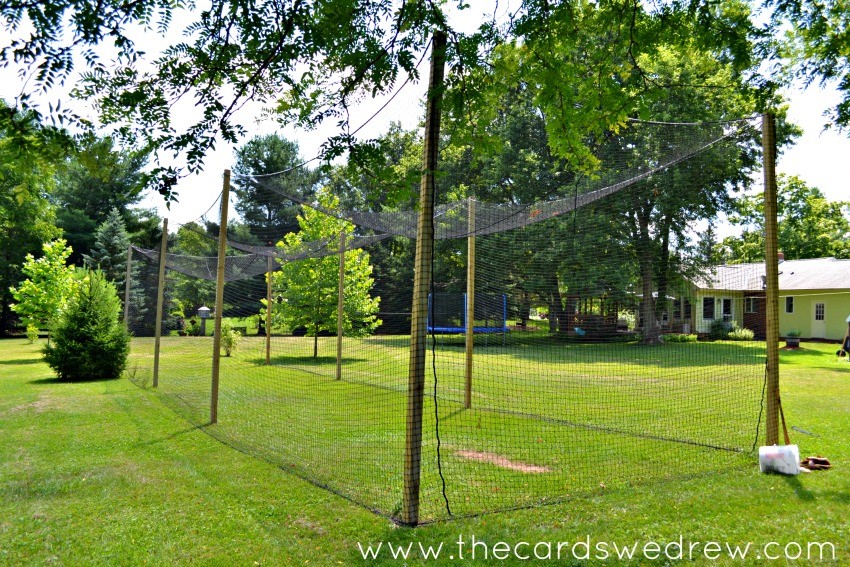
I found Net World Sports on Amazon when I was searching for nets for our DIY batting cage. They had several size options and overall, they had the best selection of nets for the best prices and the best reviews. We went with the 12 x 14 x 55 foot net for purposes of this post, but you could size up or size down accordingly as needed.
My Amazon selections for a good batting cage netting:
Trigon Sports ProCage Black Series L-Screen
Net World 55′ Ultimate Baseball Batting Cage
Fortress Trapezoid Baseball Batting Cage
SKLZ PitchBack Baseball and Softball Pitching Net and…
Home Depot also has an incredible selection of materials for building a homemade batting cage. Shopping at Home Depot can be very convenient especially if the items are in stock. We know some friends who actually built an indoor batting cage in their basement, perfect for winter training! I’m pretty sure their son is headed to the MLB ; )
How much space do you need for a batting cage?
For our batting cage, we measured 12′ across from the stake at the end and then measured another 55′ down to mark the 4th stake. So, our batting cage took up a space of 55′ x 12′. At the end, you’ll have a long rectangle measured out with a stake at all four corners. This is where you need to measure diagonally across your rectangle to ensure that the measurements diagonally match up.
How do you build a batting cage?
This question sounds simple to answer, but it is actually pretty complex! The short answer is measure out your space, buy the supplies, and then get to work.
How much does a baseball batting cage cost?
We spent around $300 to build our DIY batting cage. This included all of the frame supplies as well as the batting cage net, which can be quite pricey. If you’re thinking of building a batting cage in your own backyard, it can actually be quite helpful since it allows your baseball or softball players to practice baseball drills over and over without having to spend money at a field. Baseball training can be done in your own backyard if you create your own net just for baseball hitting!
Some people also opt to include a pitching mound, but it’s not super common and we didn’t add one to ours.
Do I need a pitching machine for my batting cage?
A good pitching machine would make a great addition to any batting cage, since you’re not going to want someone standing inside the net pitching for every practice hit. You can see my selection for the best pitching machines here. It’s important to have a high quality pitching machine to mimic a natural throw. It’s also fun to include a home plate, to get the feel of a real life baseball game. We built our net on a grassy lawn, but if you have artificial turf that would create a great feel as well!
Tutorial: How to Build a DIY Batting Cage
Step 1: Gather Your Supplies
You first need to build the batting cage frame, which includes the following materials:
Supplies (Part One):
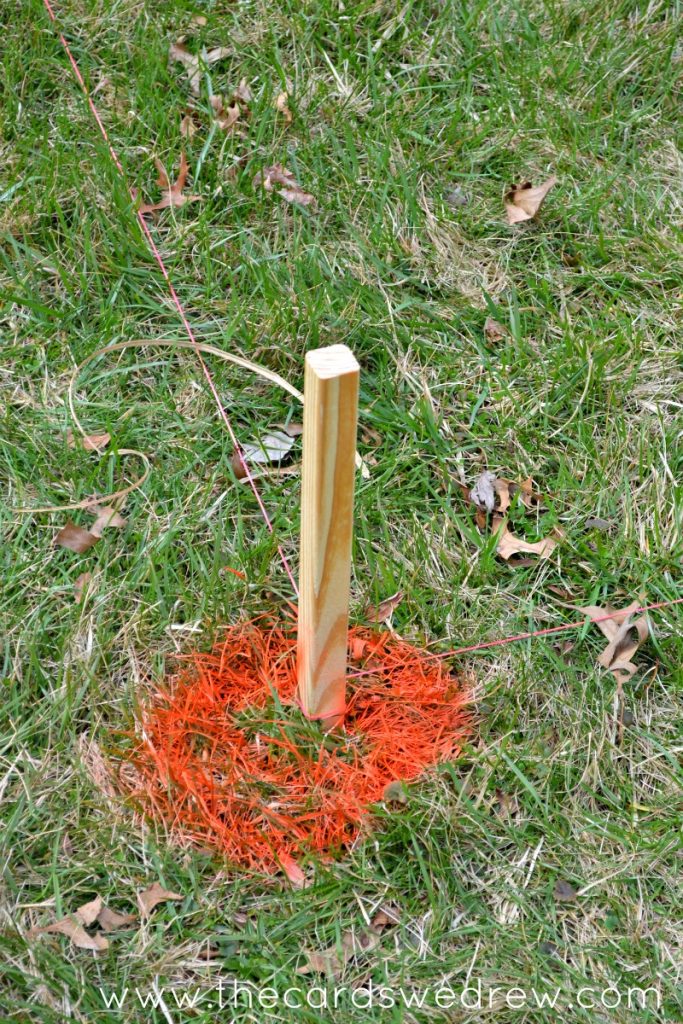
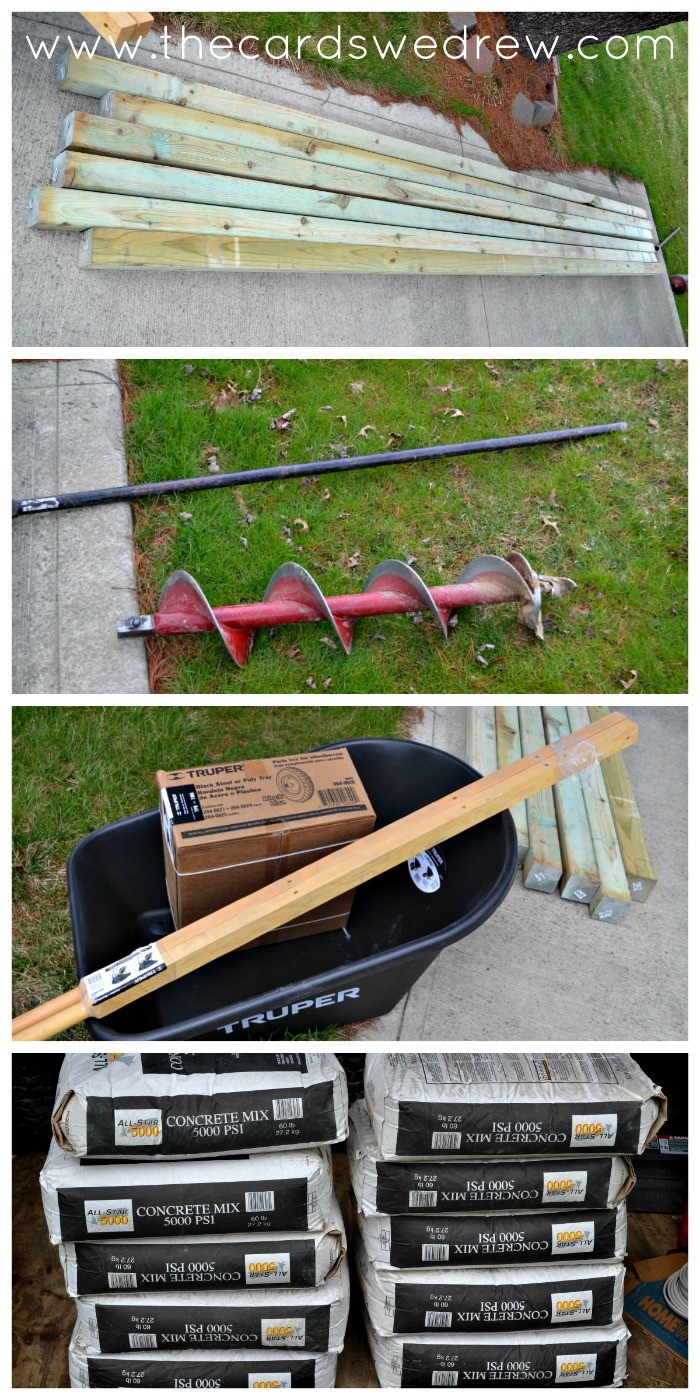
15 wooden stakes
Twine/string to tie off
10-12 bags of concrete
Auger (we rented one)
Mallet for pounding the stakes
Orange construction spray paint
Scrap wood, hammer, nails for supporting poles
Wheelbarrow and hose for pouring concrete
Instructions:
**It’s important to note that we made this structure semi-permanent. This isn’t something you’d want to do if you expect to remove it within a few years. We poured concrete posts that will remain in place until we want to remove it. This is still a high quality structure, but can be taken down**
Also, PVC pipe is an option for some of the framing if you’re looking for a different look, although it is harder to install than wood.
Step 2: Measure
Measure out our cage, lay the stakes, and ensure it was square. The net we wanted was 55 feet long x 12 feet wide x 14 feet tall, so we measured accordingly so that the stakes would lie INSIDE of the net.

You’ll need two people, 8 stakes, a long tape measure, rope to mark it off and keep it straight, and spray paint to mark the ground. We positioned the first two stakes 55′ apart with the stake marking the end of where the net will be.

For our batting cage, we measured 12′ across from the stake at the end and then measured another 55′ down to mark the 4th stake. So, our batting cage took up a space of 55′ x 12′. At the end, you’ll have a long rectangle measured out with a stake at all four corners. This is where you need to measure diagonally across your rectangle to ensure that the measurements diagonally match up.
For example, if the upper left corner measured down to the bottom right corner is more than the measurement from the upper right corner to the bottom left corner, then you know you’re not square and you need to adjust your stakes accordingly. This will ensure that all four corners are positioned correctly for the net.

Step 3: Lay Small Stakes
Once the layout is square, we then laid out our additional stakes for where the other posts would go. We ended up doing two posts on the insides of each side (so four posts total on each side). Mark out the even spots where the 2nd and 3rd post in each go, then add the posts in the ground.
After all the stakes are in place, using thick, heavy duty string, tie string around each stake connecting one to the next to ensure they don’t move. This also helps things remain square while the stakes are being drilled. You can use orange marking spray paint to make circles around stakes so that there is a clear outline of where the hole should be drilled. The stakes are very important to get well into the ground, especially if you have a strong hitter!
Important note: You need to call your local electric company to come out and mark where electrical lines run across your property to ensure that when you dig, you’re digging safely. We did that before the next step.
Step 4: Dig Holes for the Wood Posts
Next up, we rented an auger from the local hardware store. We dug each hole two feet down with the auger. We also purchased 8- 16′ tall wood beams from the hardware store. Each pole was just under $20 a piece to give you an idea of pricing. We very carefully inspected each pole to ensure that they weren’t bowed in any way. It’s also important to note that for this step we rented a truck from the hardware store. This was to bring the poles home. The truck was $20 to rent so we didn’t have to worry about borrowing a vehicle from anyone. Since you’re burying each 2′ deep and the net we used was 14′ high, we needed to get the 16′ beams. We also bought about 12 bags of concrete and a wheel barrow to help with this process.
 Next on how to build a DIY batting cage…
Dig out all eight holes with the auger. Then, put the poles into the holes and use scrap wood and stakes to hold them steady while the concrete is poured in place. This is definitely the most challenging part of the process. But will ensure that your posts are incredibly secure and straight. Use an adequate leveling tool to be sure that they are level after the concrete has been added, since it may shift just a bit.

From here, let the concrete dry. Give it a week and during that time you can clean up the dirt from all the sides of the holes. Then after it is completely hardened, remove the extra scrap wood (used for stabilization) from each pole and check your work. Again, this tutorial works for a softball batting cage just as well as for a little league or baseball batting cage. So just have fun with it and make it your very own batting cage! We even have friends who tried to make a portable batting cage. It wasn’t as big as ours, but it made outings to the park super fun! At the very least, you can use this tutorial to make a home batting cage. That will is what will make your budding pro ball player happy.
Check out PART TWO of this tutorial on how to build a batting cage here.


Would love to see part 2 as I think my husband and I are pulling the gun and going to DIY this project. Thanks!
Hi, loved the cage, I was just wondering if the posts you used were a 4×4?
Thanks
How has this lasted? Seems like the posts would start to lean in over time. Also, do you guys take it down in the winter or leave it up?
Great post! I’m hoping to install a cage and start doing lessons on my farm, also a former minor leaguer.
Steve M.
Great post, your husband and I are thinking along the same lines! How is this holding up? Anything you would do differently?
Hi Steve, it’s holding up great. We haven’t done anything to the cage since we constructed it other than to take the net down each winter. I think we’d likely consider putting the hooks inside of the cage and hang the net INSIDE of the beams vs. on the outside…mostly because it’s hard to take on and off the poles + we constantly worry that the wood will wear on the netting at some point and put a hole in it. So far it’s been fine, but because the net is so expensive, we’d like to have more peace of mind. Hope that helps!