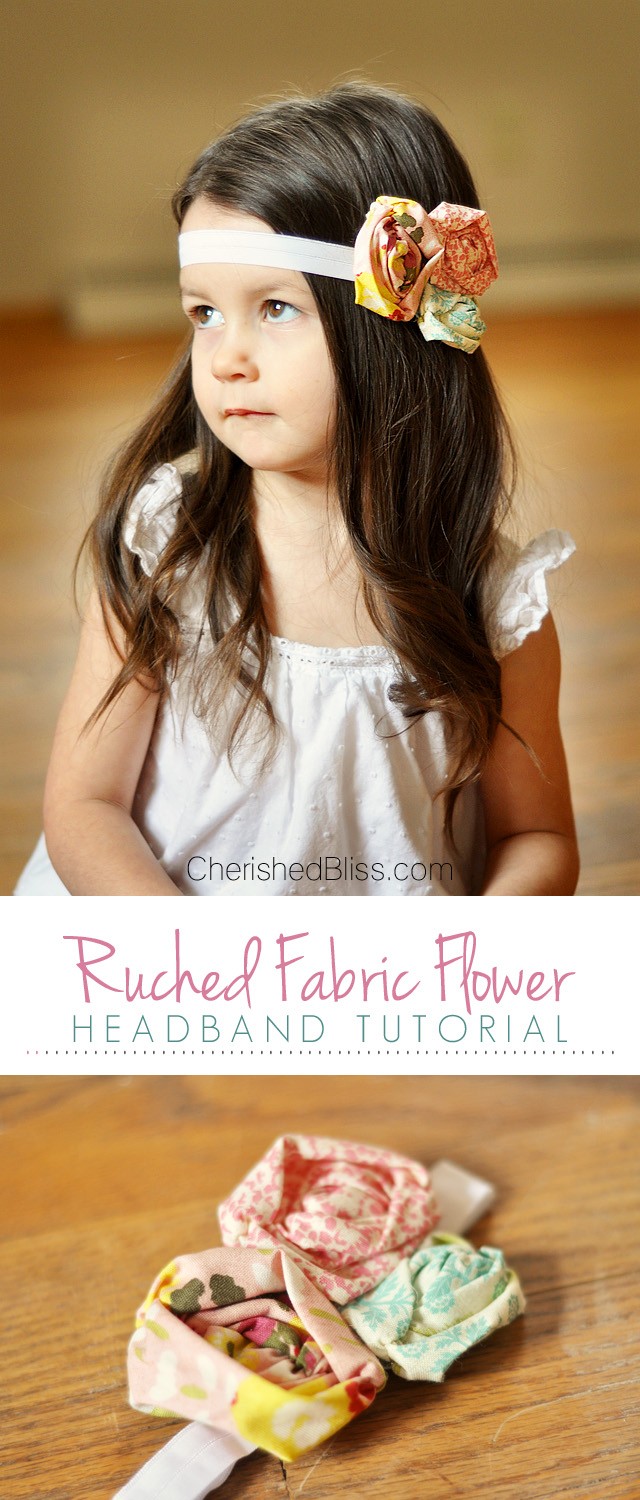
Ruched Fabric Flower Headband Tutorial from Cherished Bliss

Hello Everyone! I’m Ashley and I’m so excited to be over here at The Cards We Drew while Abbey takes some time with her new little bundle of joy! I blog over at Cherished Bliss with my sister, Audra. We share DIY projects, home decor, crafts, recipes, and anything else we think up. I would love to see you over there sometime! We are huge coffee lovers, so grab a cup and come on over! But before you head over there, be sure and check out the tutorial for this super easy Headband Tutorial I made for my little girl!

I actually used to have an etsy shop where I sold patterns and handmade headbands for babies and kids, but the work got overwhelming! However that is how Cherished Bliss was born. I started blogging to promote my etsy shop, and then I stumbled into this whole world of blogs and found that I got much more fulfillment out of offering things for free while still being able to earn an income, albeit a small one. The first first pattern I wrote up was for this Vintage Inspired Rosette Headband, which is still one of my most popular posts. Today we are going to talk about these Ruched Flowers though! These really do whip up fast, and they are so much easier than you might think! Are you ready to make an adorable headband? Let’s get started!
Supplies:
– 3 Ruched Flowers (tutorial here) of difference sizes.
– Fold Over Elastic
– Scrap pieces of white felt
– Hot Glue Gun
Tutorial:
First you need to create your Ruched Fabric Flowers following my tutorial here. I have 3 different sizes here.

Once you have your flowers, you can decide you you want to arrange them, then flip them over so you are looking at the bottom of the flowers, and then we are going to glue a small piece of the white felt to the bottom to secure all the flowers together.

Now we need to cut the elastic. Measure around the head of whoever you are making this for and subtract 2 inches. the fold over elastic is very stretchy and you want it to stay securely on their cute little noggins while they are wearing it ; ). Once it’s measure you just glue it onto the felt overlapping the ends about half an inch. Before you glue it down, be sure you have it so that the flowers are sitting the way you want when worn.

Now you just need another small piece of felt to cover up the fold over elastic. It makes it comfy to wear, and it also helps it not to slide when in your hair… especially useful for the young ones with perfectly smooth hair! : )

And that’s it! Easy peasy right?
Now… I’m not usually one to brag, but isn’t my daughter just gorgeous?! She doesn’t really let me curl her hair all that often, and it’s probably a good thing… the cuteness is a little overwhelming!

I’m not ready for her to get older, because OBVIOUSLY I will be fighting the boys off with a stick! Thank goodness her daddy is 6’4″!

If you like this tutorial, you might enjoy some of my others for little girls, like this Peek a Boo Toddler Shirt

and the Vintage Inspired Baby Headband Tutorial

and while you are in baby mode, you might want to check out my newest little guy’s Nursery Reveal

I hope to see you around! I would love to connect with you, so grab that cup of coffee!
Find us here:
Ashley: Facebook // Twitter // Pinterest // Google +
Audra: Facebook // Twitter // Pinterest // Google +


What a pretty idea! It looks great and extra cute on that sweet little model. Thanks so much for sharing. Pinned!
These are so stylish and simple! I love fold over elastic 😉
Visiting from TT&J linky 😉
Ursula @ https://kraftmint.com {modern crafts }