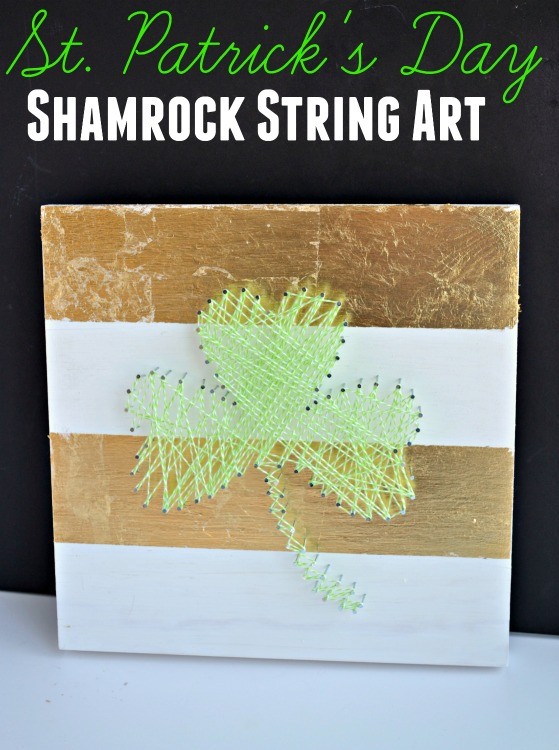
St. Patrick’s Day Shamrock String Art
March is near and I thought I’d re-share this St. Patrick’s Day Shamrock String Art that incorporates my favorite color…gold! So mix up your home decor with this fun string art project and include your kids in the fun!!

Shamrock String Art Supplies:
- Unfinished Wooden Plaque
- Green Baker’s Twine
- White Americana Chalk Paint
- Paint Brush
- Washi Tape or Painter’s Tape
- Gold Leaf and Gilding Cream
- Hammer & Mini Nails
Step 1. Start by painting your unfinished wooden plaque white using a paintbrush and Americana White Chalk Paint.
 Step 2. After paint is dry, use a measuring tape to measure 3 inches along the top and the bottom of the board. Use your pencil to make marks at the top and the bottom.
 Step 3. Use painter’s or washi tape to tape off the lines. You’ll be doing 2 thick gold lines, so you’ll put the tape on the outsides of where those lines will be. See below. Where the pencil and the paintbrush sit are the areas that will be gold…the other two areas will remain white.

Step 4. Once your areas are taped off securely, use a paint brush and add gilding cream over those areas and allow to dry for a few minutes until tacky. Then add your gold leaf gently on top of the gilding cream. **Gold leaf is VERY forgiving. If a spot lifts up or doesn’t cover, simply take another piece of the leaf and dab it over top and it will stick. You’ll need about 3 sheets of leaf per stripe. Use your finger to rub the leaf into place over the gilding cream.

Step 5. Brush off excess leaf and remove tape and VOILA! You’ve got your pretty gold stripes!
 Step 6. Next up is using a cutting machine to cut out a shamrock. If you don’t have a cutting machine, you can also find a shamrock image you like online and print and cut it out by hand. I used my Silhouette to cut out a shamrock on a scrap piece of scrapbooking paper. Then I laid it on top of my plaque and positioned it in the center.
 Step 7. Next, take your mini nails (found at local hardware stores) and a hammer and gently add nails around the shamrock. I started with all the major corners of the shape and then worked around the edges.
 Step 8. Evenly add nails around the entire perimeter of the shape. It’s hard to get them perfectly even and straight, but do your best.
 Step 9. Once all your nails are added, remove the scrapbook paper and reveal your nail outline of the image! Next up…string!

Step 10. There’s really no rhyme or rule as to how you add your string. I started at the top and just wound back and forth and around and up and down until I reached my desired look. The shamrock isn’t the easiest thing to do string art with, so I couldn’t find a perfectly unified way to do the string, but I still love how it turned out!
 Step 11. Ultimately, the goal is to fill the string in enough that it makes the shape stand out.
 And I definitely think it does!
I hope you enjoyed this string art tutorial!! Happy early St. Patrick’s Day!
